
We recently demonstrated how to build a Commodore 64 cart. This was the basic cart as originally planned on the Commodore 64, but at some point they started to develop larger-than-anticipated carts with multiple different standards; one of which is named Magic Desk.
Today’s article will discuss this standard, how it came to be, and how to build such a cart.
Click here for more articles on the Commodore 64In the early days of the Commodore 64, some productivity software called Magic Desk was published. It brought some graphical user interface and productivity software to the Commodore 64 echosystem.


While the reception was great, development was difficult and only the word processor was ever published. The software was packaged as a cart in order to free up disk for word processing needs such as storing typed documents. However, the format used within the cartridge itself was interesting, pushing the ROM limit to bigger than the usual 16k. This was also done for some other games by developpers such as Ocean Software, but the Magic Desk format resurfaced in recent years as Do-it-yourself carts, with PCBs such as this 512k Magic Desk compatible PCB by msolajic – which is also available as shared project on PCBway. There are now Magic-Desk compatible PCBs up to 1024k available such as this other one by solajic that is also compatible for Ocean Software carts, is open-hardware and is available as shared project on PCBway.
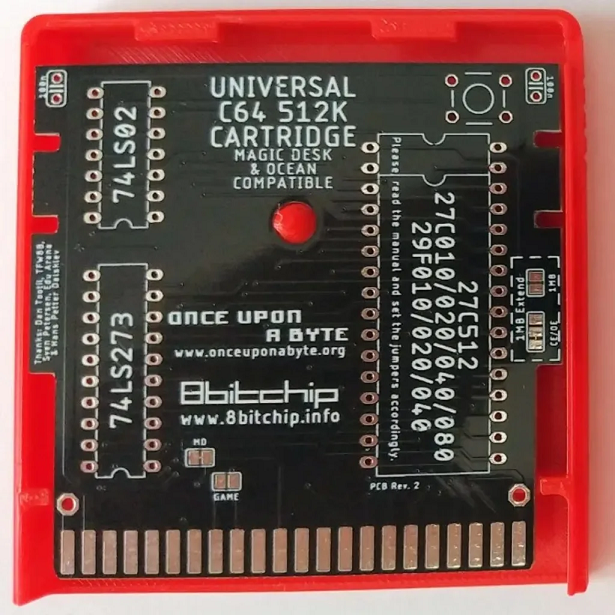
These carts accept bigger EPROMs – 1024k eproms accept much more software than 512k ones. The aditionnal 74LS-series logic chip is used to handle bank switching internally within the cartridge and expose only what’s needed to the Commodore 64, in addition to the PLA logic the computer already uses. However they require something to boot up – Normally the cartridge software such as the magic desk or a specific game software would be made to handle this. That is pretty much how Ocean Software managed to have very large games on cartridges.
Bundling normal software on MD-compatible carts
What if this large cart isn’t to be used by a single large software, but by multiple smaller ones? That is why the Magic Desk Cartridge Generator was created: to bundle a bunch of smaller software into one binary file and include a boot-up selection menu.

This option permits to push PRG programs to a cart, to combine many into one single cart and use up most of the chip.
It is great to package similar software together and can make a rather useful diagnostic utility cart when paired with several of the programmed described in our diagnostics tools article.
Preparing the Magic Cart binary
The binary is essentially compiled from several programs, ran into the Magic Cart Generator. Magic cart generator is essentially a python script that takes it’s config file and make its magic (pun intended)
The config file can make one or many menu and separate programs into them. It can be animated and have music.
The header of the configuration gives the name, but also the expected size in kilobytes, not in kilobits – the chips are in bytes so a 512 kilobits EPROM can receive a 64 kilobytes binary. If the programs entered into the configuration files are making it bigger than the expected binary size, an error message will be displayed.
The command would run like so
python crtgen.py configfileand the result would be the binary file as named in the configfile.cfg file.
Burning the EPROM
Either it being a binary magic cart taken from the web or one created using the Magic Cart Generator tool, the process is the same as anything being burnt on EPROM.
If by mistake a larger binary is burnt in a smaller EPROM, only the size that fits into the EPROM will function as expected. Geeks beware.
Bill Of Material
- Cartridge PCB
- EPROM (size vary depending on needs)
- 74LS02
- 74LS273
- Sockets (if wanted) (recommended at least for the EPROM)
- Shell (3d printed or store-bought online)
Construction
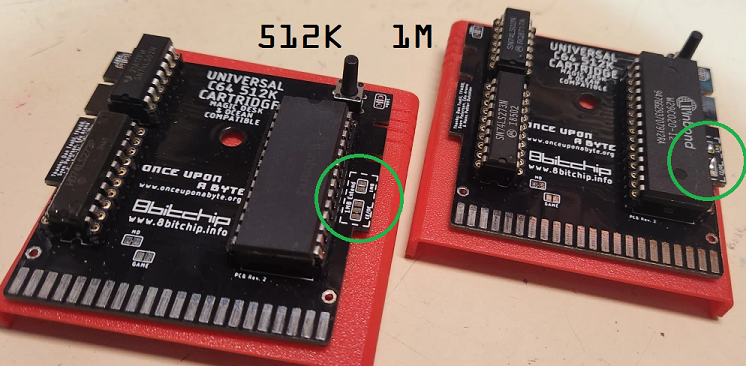
Again, making prototyping carts fot the 512 and 1024 eprom size variants (not exactly same soldering) is a great idea – only once the burnt EPROM works on the prototype cart a geek can comit to soldering parts on the PCBs.
There are 3 jumpers on the back of the cart PCB, meant to set the PCB correctly for the chip intended to be soldered onto it. There are instructions on the msolajic GitHub site, but here’s a recap of the information.


That being said, for a large EPROM (1M) – the front configurations jumpers needs to be altered as well.

The capacitors, resistore, LEDs and switch are not essential, but the 74LS273 and 74LS02 are. Direction is important. It may be a great idea on the prototype boards to put these logic chips in sockets, in order to test upcoming chips prior to soldering them to future cart PCBs.
Assembly
Once the PCB is working and tested, assembling it to the cart shell and labeling is all there is to it.
Enjoy!

Related Articles
Build a C64 cart (wereallgeeks)
Magic Desk (wikipedia)
512k Magic Desk C64 cart by msolajic (github)
512k Magic desk cart shared project (PCBway)
unicart 1024k Magic Desk by msolajic (github)
1024k Magic Desk cart by solajic shared project (PCBway)
Magic Desk Cartridge Generator (bitbucket)
Commodore 64 diagnostic tools (wereallgeeks)


Pingback: C64 cartridge LED mods – We are All Geeks!
Pingback: Build your own Commodore 64 cartridge – We are All Geeks!