Last time we looked at adding HTTP volume control to our vintage radio. While this is somewhat useful, it requires to go to a specific webpage, likely using the IP address of the Raspberry. That is not what home automation normally does. There must be better ways.
When there is a home automation server available, the best way to control anything is trough said server.
We mentionned MQTT when we talked about unclouding commercial smart devices.
Today we look at taking the raspberry pi that stands between the record player and radio amplifier in order to make it an MQTT compatible device that talks to Home Assistant – in a way that Home Assistant will fully understand.
There are multiple guides online that demonstrate how to install an MQTT broker on Raspberry pi so that smart devices can communicate with it. Installing a broker on the Raspberry is not what this blog entry is about. We are working on the other end entirely. Let’s assume we do have an MQTT broker, what we want is to have a Raspberry pi to act as a smart device and interract with Home Assistant trough it. Such broker could be Mosquito that incorporates rather well with Home Assistant, or any other broker.
We will look at how to program proper MQTT from within the pi, talk with this broker, and have Home Assistant interaction.
Paho-MQTT
There is a lightweight python-based mqtt client implementation that runs well on Raspbian, named Paho-MQTT. Lots of resources already exists online about getting started with paho-MQTT and the goal isn’t to reinvent such guides. There is one here https://mntolia.com/mqtt-python-with-paho-mqtt-client/
The issue isn’t to get started, but to program home assistant compatible mqtt. Most devices we control within Home Assistant using an integration – part of the Home Assistant code used specifically to facilitate usage of those devices. When adding a custom device, there is no integration unless we make one – which isn’t the scope of this blog entry. Today we will use the MQTT integration and the base features available within Home Assistant and have the device tell Home Assistant what to do. Trought MQTT.
Auto-Discovery
Home Assistant uses MQTT Auto-discovery – when a specific set of messages are being red on MQTT, devices will automatically be visible from within Home Assistant. This isn’t the same level as having a specific integration, but at least we don’t have to do everything by hand.
What is Paho-MQTT?
Paho-MQTT is essentially a python script that speaks on the network using MQTT, and the goal is to speak MQTT that Home Assistant understands to populate entities. There is documentation on the Home Assistant page https://www.home-assistant.io/docs/mqtt/discovery/ EDIT: link no longer functionnal. For more information on MQTT discovery, there is a section on home-assistant.io that may be useful. The PAHO mqtt package is still functionnal
here’s the beginning of the mqtt.py file we will need
#!/usr/bin/env python2

import paho.mqtt.client as mqtt
import paho.mqtt.publish as publish
import time
import ConfigParser
import json

clientname = "Philco"
hostname = '192.168.0.5'
port = 1883
timeout = 60

# callback for CONNACK response from the server.
def on_connect(client, userdata, flags, rc):
    print("Connected with result code "+str(rc))

# callback for received messages
def on_message(client, userdata, msg):
    print(msg.topic+" "+str(msg.payload))

client = mqtt.Client(clientname)
client.on_connect = on_connect
client.on_message = on_message

client.username_pw_set("MqttBroker", "mqtt")
client.connect(hostname, port, timeout)

client.loop_start()

while True:
    topic = "homeassistant/something/something"
    data = { 'something':  55 }
    client.publish(topic, json.dumps(data))
    time.sleep(1)
With this, we have basic MQTT spilling fixed values, which is nothing helpful within Home Assistant.
To get something useful, dynamic data (trough programming) will be needed, and most importantly, Home Assistant will need to understand the intent behind our MQTT messages. This will happen once the device announces itself properly, and fills data in an appropriate manner. For Home Assistant to actually understands what to do with the device, the device needs to configure Home Assistant. Trough MQTT.
The first thing to do is for the device to announce itself, trough a configuration topic. There is a specific way to do so. Let’s begin with something unidirectionnal.
Say we want to push the CPU temperature of our Raspberry pi to Home Assistant, as a Temperature Sensor. As stated in the discovery page, the discovery topic need to follow a specific format:
<discovery_prefix>/<component>/[<node_id>/]<object_id>/config
discovery_prefix is the name of homeassistant in the Home Assistant configuration – here homeassistant.
component is the type of supported MQTT discovery component – here sensor
node_id is facultative, we will not add it…
object_id is the name of the entity, one per sensor – here philco-temperature
config is a standard mandatory keyword.
The resulting configuration topic in our case will be homeassistant/sensor/philco-temperature/config
Then, the data supplied within the config varies per component. The MQTT sensor page describes what’s needed for a sensor.
state_topic is the only one that is mandatory, but value_template will also be used to tell HomeAssistant how to read the data from within this topic. Additionally, HomeAssistant will need a unique identifier to discriminate between multiple of similar devices should more than one be present.
Here is the data for the config topic for our temp sensor:
topic = "homeassistant/sensor/philco-temperature/config"
payload = {"unique_id": "philco-cpu-temperature",
               "device_class": "temperature",
               "name": "Philco-Raspberry core temp",
               "state_topic": "homeassistant/sensor/philco-temperature/state",
               "unit_of_measurement": "'C",
               "icon": "hass:chip",
               "value_template": "{{ value_json.temperature }}" }
The topic is a string, while the payload is a dictionary with all the fields we want to populate – this is what tells HomeAssistant what to do. The value_template is a way to tell HomeAssistant what to look for in out state_topic – multiple values from multiple entities could be set within a same state topic and we chose the name temparature for this sensor.
This translates into code that needs to be added in the while loop in such fashion
(we also added temperature libraries to the file):
#top of file
from gpiozero import CPUTemperature

#[...]

#main loop
client.loop_start()

while True:

    topic = topic
    data = payload
    client.publish(topic, json.dumps(data))

    cpu = CPUTemperature()
    temperature = cpu.temperature

    topic = "homeassistant/sensor/philco-temperature/state"
    data = { 'temperature':    round(temperature, decim_digits) }
    client.publish(topic, json.dumps(data))

    time.sleep(1)
that being said, the configuration topic shouldn’t be sent every time, so code should be added to send it only at a lower interval.
Also, the temperature could be sent only when it changes, to reduce clutter on the network.
But now, we should have a CPU temp sensor entity auto-detected and usable within Home Assistant.

Bidirectionality
Now on to something a bit more complex: two-direction communication with Home Assistant. We’ll look at volume and mute (or audible, the opposite of mute)
Volume will be a sensor with a numeric value, very similar to the temp sensor we just did, but we also want to receive a value from the server; ib the other hand, audible will be a switch (on/off) controllable from within Home Assistant. We opted to name it audible and not mute, so we hear something when the switch is ON, similarly to an on/off switch. — That will be useful later 😉
Configuration for a switch
Switches are a different component than sensors and are defined here https://www.home-assistant.io/integrations/switch.mqtt/
Here is the topic/payload for the switch
switchstatetopic = "homeassistant/switch/philco-audible/state"

switchtopic = "homeassistant/switch/philco-audible/config"
switchpayload = {"unique_id": "philco-audible",
                "name": "Audible",
                "icon": "hass:ear-hearing",
                "state_topic": "homeassistant/switch/philco-audible/state",
                "command_topic": "homeassistant/switch/philco-audible/set",
                "value_template": "{{ value_json.audible }}" }
The main difference between a sensor and a switch, is the value – one is on/off while the other has a numeric value; and the fact we supply a set command for the server to bring this data back to the device – command_topic. In HomeAssistant, the set topic is automagically handled for a switch (and a light, that quite literally includes a switch).
Adding set topic to a sensor
We can mimick this set feature in non-auto-discovery fashion but that requires more work, let’s do it with volume.
Here is the topic/payload for the volume
volumestatetopic = "homeassistant/sensor/philco-volume/state"
volumetopic = "homeassistant/sensor/philco-volume/config"
volumepayload = {"unique_id": "philco-volume",
                 "name": "Philco Volume",
                 "state_topic": "homeassistant/sensor/philco-volume/state",
                 "unit_of_measurement": "%",
                 "icon": "hass:volume-high",
                 "value_template" : "{{ value_json.volume }}"}
volumeset = "homeassistant/philco/volume/set"
See we are adding a (fake) volume command topic, artificially.
Processing the incoming SET topic within our code
Now, while those topics will exist and are broadcasted by Home Assistant, the device needs to do something with it. for that to happen, we need to listend to these topics, which is done at initial connection to the broker.
# callback for CONNACK response from the server.
def on_connect(client, userdata, flags, rc):
    print("Connected with result code "+str(rc))
    client.subscribe("homeassistant/switch/philco-audible/set/#")
    client.subscribe("homeassistant/sensor/philco-volume/set/#")
Then, we need to act upon this message, which is doone in their callback. There is one callback for receiving messages:
# callback for received messages
def on_message(client, userdata, msg):
    if msg.topic == "homeassistant/sensor/philco-volume/set" :
      #print("Volume being set to " + msg.payload)
      floatpayload = float(msg.payload)
      numericpayload = int(floatpayload)
      m = alsaaudio.Mixer(control='Speaker', cardindex = 1)
      m.setvolume(numericpayload)
      if numericpayload > 0 : m.setmute(0) #auto unmute
    if msg.topic == "homeassistant/switch/philco-audible/set" :
      #print("Mute being set to " + msg.payload)
      m = alsaaudio.Mixer(control='Speaker', cardindex = 1)
      if msg.payload == "OFF" : m.setmute(1)
      if msg.payload == "ON" : m.setmute(0)
Also, we need to publish the values like we did with the temperature sensor, in the main loop:
client.loop_start()

while True:
    #sends data to server - perhaps alter to not send it when not required
    m = alsaaudio.Mixer(control='Speaker', cardindex = 1)
    vol = m.getvolume()[0]
    topic = volumestatetopic
    data = { 'volume': vol }
    client.publish(topic, json.dumps(data))

    #convert mute state to ON OFF to send HA
    mutestate = m.getmute()[0]
    audiblestate = 'ON'
    if mutestate == 1 :
      audiblestate = 'OFF'

    topic = switchstatetopic
    data = { 'audible': audiblestate }
    client.publish(topic, json.dumps(data))

    #periodically send config topic
 (add periodical code here)
    topic = volumetopic
    data = volumepayload
    client.publish(topic, json.dumps(data))

    topic = switchtopic
    data = switchpayload
    client.publish(topic, json.dumps(data))

    time.sleep(1)
Now, from within Home Assistant, the switch will be automatically detected and populated, but to allow for volume to work in a bidirectionnal manner, we will use a helper variable. This helper value, an input_number, will be associated to a set of two automations that will sync the device volume, to the input_number (represented by a slider).
One will be trigerred by the state of the input number (when it changes) and will send MQTT:

And the other to ensure that volume obtained from the device is reflected within Home Assistant

Home assistant can access the input_number or the sensor entity separately; the automations should make them follow one another’s value. The audible switch is separate and autonomous.

All-in-one integration
Now, what about having an all-included entity with both the volume level and the on/off state? We didn’t find anything within Home Assistant intended for volume outside of a multimedia entity, but how about repurposing the mechanism for lights? brightness intensity as volume, on/off for the audible state…
MQTT auto-discovery lights are described on this page https://www.home-assistant.io/integrations/light.mqtt/
We will look at the Brightness command topic to work with Volume, and the command topic to work with the audible state.
Note: there is nowhere to insert an icon on the lightswitch MQTT configuration. This will have to be done manually within Home Assistant unless we want the volume knob to use a lightbulb icon. Adding wrong fields within the topics would lead to Home Assistant to reject the message (and do nothing) but looking trough the logs should help understanding what is going on.
Here is the topic/payload for what we named knob
knobtopic = "homeassistant/light/philco-knob/config"
knobpayload = {"unique_id": "philco-knob",
                "name": "Philco Control",
                "brightness_scale": 100,
                "state_topic": "homeassistant/switch/philco-audible/state",
                "command_topic": "homeassistant/switch/philco-audible/set",
                "state_value_template": "{{ value_json.audible }}",
                "brightness_state_topic": "homeassistant/sensor/philco-volume/state",
                "brightness_command_topic": "homeassistant/sensor/philco-volume/set",
                "brightness_value_template": "{{ value_json.volume }}" }
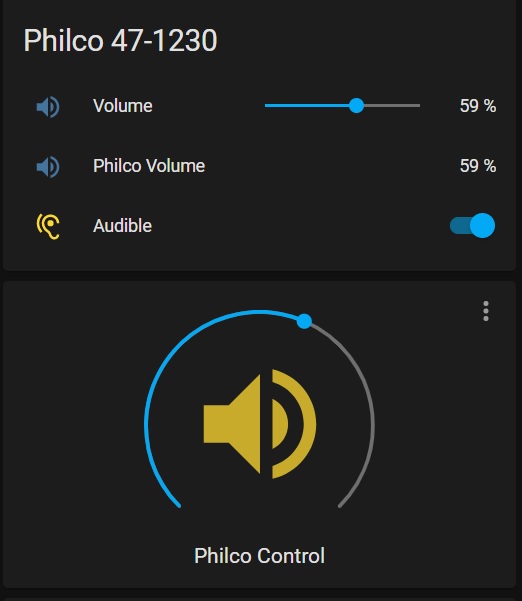
While we need to add the propagation of this config topic within the main loop in the same manner of the previous ones, we are reusing the same state and command topics as previous entities; so no other alterations is requied on the mqtt.py file to process the values in and out. the end result is an all-in-one knob within Home Assistant (but with a lightbulb icon until we do the manual changing of the icon) and it looks like this, alongside previous entities:

The only thing left is to ensure the mqtt python script runs on its own. This can be achieved by adding a cron job to a shell script that validates if the python script is running, and if not just launches it.
In the end, it offers quite a lot more possibilities than just an HTTP control page.
Now, let’s go and spin some records.
Related Articles:
Adding http volume control to Raspberry (wereallgeeks)
Installing Home Assistant on Raspberry (wereallgeeks)
Unclouding smart devices (wereallgeeks)
MQTT (wikipedia)
What is the MQTT protocol (High Voltage)
Paho-MQTT guide (mntolia.com)
MQTT integration in Home Assistant (burnsHA on youtube)
Home Assistant MQTT auto-discovery (HomeAssistant)
Home Assistant MQTT Sensors (HomeAssistant)
Home Assistant MQTT Switches (HomeAssistant)
Home Assistant MQTT Lights (HomeAssistant)

